(click any photo for a larger image)
Monday, April 22, 2024
Wood and Acrylic Resin Segmented Bowl
Wednesday, April 3, 2024
Curved Ringmaster Bowl from Two Different Blanks
(Click any pic for a larger image)
While the method of making curve-sided Ringmaster bowls uses twice as much wood, you can be more creative with the blanks. I cut the rings for this bowl from two entirely different blanks. The first was 12 segments, purpleheart with 1/4" maple spacer between the segments. The second blank had 24 segments with alternating yew and white maple.
I'm a bit disappointed in the lack of contrast between the woods. I wish I'd gone with a darker mid-tone brown, like walnut. However, it's a little late now. 😏
Here is a diagram showing the plan... this is how I thought the rings might align.
Tuesday, July 12, 2022
Ringmaster Curved 'Dizzy Bowl'
Wood turners have been making dizzy bowls for years, but the Ringmaster has made the process a bit easier. (See 'What The Heck is a Ringmaster?")
Most Ringmaster dizzy bowls to date, have had straight sides. This is my attempt to make one with curved sides. (See Curved vs Straight Sides below.)
Wednesday, April 6, 2022
Ringmaster Curved Bowl with CNC Inlay Bottom
(Click any pic for a larger image)
Being a packrat, I have lots of exotic hardwood scraps (some pieces I've had for 20+ years) that I'm sure I'll find a use for someday. 🙄
I sawed a bunch of it into strips of various lengths and widths, but precisely 1/4" thick. That's where the new drum sander started earning its keep -- it would have been much more difficult to achieve this without it. For this project, there will be approximately a dozen different species of hardwood.
You can see these pieces in side shots of the bowl.
I wanted a decorative false bottom for this bowl and made it with the CNC router. It's a Coast Salish-themed Orca, done in wood inlay. In other words, the wood pattern is carved out with the CNC router, then filled by gluing in different coloured wood created with the router.
The 1/4" thick false bottom is a medium brown oak. The image has three separate inlays using dark walnut, red 'bloodwood', and the lightest eastern maple I could find. The bottom was cut in a circle with the inside edge chamfered to fit the sloping sides of the bowl, all with the CNC router.
There are several little imperfections in it that drive me crazy, but it was a good learning experience.
Wednesday, November 3, 2021
Ringmaster Bowls -- Straight versus Curved Sides
(Click any pic for a larger image)
For the first few years after getting my Ringmaster, I only made straight-sided bowls, which is all you can really do when the rings are cut from one disk.
A couple of years ago, I joined a Facebook group called 'Ringmaster Lathe' (Ringmaster Lathe Group). A member there has developed a technique of making curved Ringmaster bowls using two blanks instead of one, which he generously shared with the group.
The blanks can be segmented, and glued up using two or more hardwood species, resulting in various patterns in the finished bowl.
For my first attempt, I made one thick blank -- 1.5" thick -- and ripped it into two blanks at the band saw. These blanks are segmented yellow cedar, red cedar burl, and a sandwich layer of 3/16" mahogany. They were then cut into rings on the ringmaster.
A freshly glued-up bowl is rough and requires considerably more shaping and 'cleaning up' at the lathe, than a straight-sided bowl. A razor-sharp bowl gouge or curved scraper seems to do the trick. Then sanding at the lathe, from 60 or 80 grit, right up to 600+.
Bill's technique uses twice the wood and it's twice the work, producing two blanks instead of one, but I think it's worth it.
And here's the finished bowl (note the curved sides versus the straight sides of the bowl at the top of this post).
Thursday, July 22, 2021
What the Heck is a Ringmaster ???
The Ringmaster is most commonly sold as a stand-alone lathe & motor unit as above, but you can also purchase the cutter attachment only, and bolt it to your lathe bed. That's what I have.
The crank on the right moves a set of cutters back and forth through the blank. In the photo above, the red circle shows the cutter travelling through the disk.
The rings as they come from the disk, and in a press being glued together. The following are three plain straight-sided ringmaster bowls.
Wednesday, November 18, 2020
Quick CNC Router Project -- Zoe's Leash Rack
This was a quick little project using the CNC Router. It was to make a rack hung near the back door, where we could hang all our dog's leashes, harnesses, collars, etc.
I retired with some computer skills that lent themselves nicely to this amazing machine. The item is designed in a computer drawing program. Then another program writes instructions for the machine, telling it how to move the router bit 3-dimensionally.
You can see it working in this 3-minute video.
Sunday, November 15, 2020
Some New Tools
(Click any pic for a larger image)
I have purchased the following toys tools over the past few years, and enjoy them immensely. From oldest to newest...
1. Ringmaster Lathe Attachment
This device bolts to the lathe bed near the chuck and cuts rings from various-sized disks, which are then glued together, forming a bowl.
In the photo above, there is a red circle around the cutter making its angled cut through the blank. More about the Ringmaster in a future post called, 'What the Heck is a Ringmaster"?"
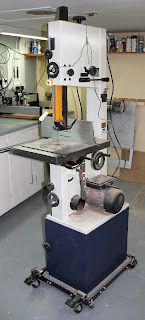
2. Rikon 14" Bandsaw
Before this saw, I had one I'd purchased 30-ish years ago from the long-defunct 'House of Tools'. It was a terrible saw and eventually became dangerous. I removed the motor and took the saw to the recycle, rather than sell it to some unsuspecting woodworker who might be injured while using it. The new Rikon has a 6" high fence and 14" of clearance for resawing.
For more pics, click 'Read More' below
Monday, November 2, 2020
Maple Burl End Table
(Click any pic for a larger image)
Several years ago, someone gave me some 3/4" slices from a 'bird's eye' maple burl. The two largest were 'mirrored', and glued into a single piece. From this, a round disk was cut approximately 14" in diameter.
Note the two red arrows at each end of the glue joint.
The center spindle was eastern maple turned on the lathe. The three curved feet were made from quilted oak.
Normally, when I bring new pieces up from the basement, my considerably better half says words to the effect, 'that's lovely, dear', and permits the new piece a short period of display time in the family room. But eventually -- I'm sure in the dead of night -- most of them disappear to some remote corner of our home, seldom noticed again.
But this burl table has apparently found a permanent home in our family room where any unsuspecting, innocent company might actually see it. So far; so good ... 😁
Friday, October 30, 2020
A Close Shave
Of toil and sin,
Your head grows bald
But not your chin!
Burma Shave
Maybe I had them in mind a few years ago when I went on a razor-making tangent. A few of the adult males in my long-suffering family were about to receive more clutter from my shop for Christmas.
Thursday, October 29, 2020
A Root-Ball Bowl
(Click any pic for a larger image)
Many years ago, a neighbour was removing a dead arbutus tree from his back yard and noticed a big knot or burl in the center of the root ball, so he thoughtfully gave it to me. As you might imagine, the whole mass was a mixture of wood, small stones, and dirt. After much blasting with the garden hose and hours resharpening tools, this small bowl emerged -- approx 6" across at the top.
Saturday, October 24, 2020
Smarter Than Your Average Dog!
(Click any pic for a larger image)
My brother's companion out in the shop is an old yellow Labrador retriever named Elliott. Elliott, being smarter than your average bear, has learned that when he hears the thickness planer start up, there will soon be a soft comfortable place to sleep and a thick blanket to keep him warm. He immediately runs to the machine and lies down under the chip discharge. 😊
December 16, 2020 Sad news... My brother had to make an agonizing decision about Elliot earlier today. He had a local vet visit their hobby farm, and after a good long life, Elliott's aches and pains were gone. My brother and his family are mourning the loss of this wonderful old dog.
Friday, January 10, 2020
The Beetle-Kill Pen

One person who looked at this photo, noticed there is an alien hiding in the grain. Can you see him? 😉
Friday, June 1, 2018
Workshop Pics -- Before and After
Back around 2005, I renovated an old garage in our basement. Before we bought the house, the old entry door for cars was sealed up and a new room created. It was pretty nasty in there. The following are before and after pics, looking at all 4 corners.
The headroom in this area is only about 6' 6" so I'm envious of folks with large shops with plenty of height.
Now 15 years later, it is a bit rougher around the edges... 😂 I'll show some more recent pics in upcoming posts.
I wish it was still this neat and tidy... 😬😫


